
Get Correct Saddle Height - 200-Level
I've previously written an article about the best simple way to set correct saddle height, so if you're interested, you can read that here. But the simplest method will, by nature, glaze over some important factors and while it may be the "best simple" method that still means it can be far from the best. That is certainly the case for saddle height, so in this 200-level article we're going to hash through a slightly more complex process, but one I think that will produce a good result for more people.If you've been considering attending one of the bike fit courses, this is a good introduction into the basics of bike fitting (the 300-Level course coming up next will actually exceed a lot you will learn at one of the courses, and, yes, it's still going to be free).Perhaps you're an athlete who just wants a more accurate way to check your own fit -- anyone can benefit from the use of this method and will learn something about the process and certainly something about themselves along the way.We're going to call this the Basic Video Method.
Basic Video Method
Up until a few years ago, assessing any sort of movement or activity through video was the purview of sport scientists and tech-savvy coaches only. The software to analyze the video taken by expensive high-speed cameras could run thousands of dollars, and of course the cameras themselves were not cheap either.As with many things, the iPhone changed all of that. Thanks to the folks in Cupertino, CA not only do we have access to a high speed camera in our pockets (the new iPhones shoot at 120 frames per second which is just about perfect for assessing someone's pedal stroke) but there are also free apps available to help us notate, assess, and measure joint angles right on top of the video we shoot.What's required? It helps to have a camera on your phone or tablet with the highest frame rate (frames per second or fps) possible. As I mentioned the new iPhones are ideal, but even if you have a phone that only records between 30-60 fps you can still make this work. The picture may be more blurry or it might not pause at exactly the right moment of the pedal stroke you'd like to measure (because it has fewer frames to choose from to stop on), but with a little care you should be able to take some basic measurements.A GoPro is also a good option. Even if you don't own one yourself many of us have friends and acquaintances that have one. The GoPro Hero4 can shoot at 120 fps, and recording about 30-60 seconds of video of you pedaling would give us more than enough to work with (don't forget to record from both sides).For the purpose of establishing a saddle height, we're going to record video from the side or lateral view: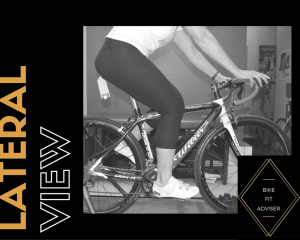 This gives us easy access to measuring knee flexion and extension and ankle plantar-flexion and dorsi-flexion, which are the cardinal motions we need for this task. Knee flexion and extension are the amount of bending (flexion) and straightening (extension) the knee goes through. The ankle motions can be thought of as the amount that the ankle moves into the "toes-down" position (dorsiflexion) and "toes-up" (plantarflexion).
Pro Tips: Bike Fit Landmarks
To make the measurement process simpler you can mark the location of the joints we're going to use. This can be very difficult for some joints, but locating a reference point for the knee, hip and ankle joints can be done with enough accuracy for our purposes by anyone. All of these will be found easiest with the rider on the bike and with their foot on the pedal in the forward or "3 o'clock" position. Now all you need is a few pieces of tape.
Hip:
Feel along the outside of the hip and you should notice a bump -- this is the greater trochanter of the hip. Now we're not talking about "hips" as in "standing with hands on hips". Those "hips" are actually the top of our pelvis; we want to move below to the area on the side of the hip in line with our butt muscles. Once you find this bone, carefully place a piece of tape on it -- make sure the tape is a contrasting color to the rider's shorts.
Knee:
Looking at the knee from the side, find the kneecap. From the bottom of the kneecap, move backwards to around the center of the knee structure and place a piece of contrasting tape here on the skin. This is our rough estimate of the center of rotation of the knee.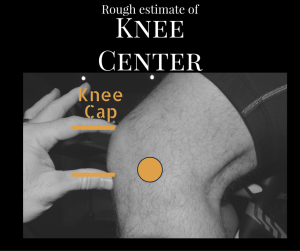 Here is an additional image with some "x-ray vision" built in so you can see where the skeletal structure is like below where we're palpating (for simplicity, the fibula was removed so as not to clutter up the view):
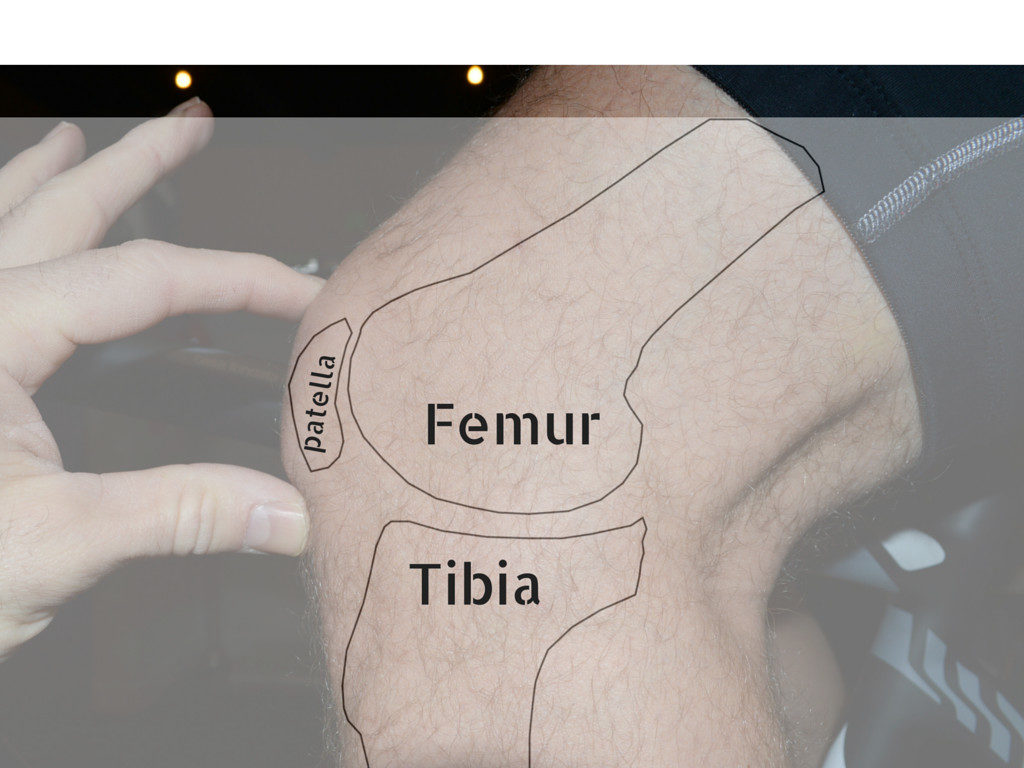
Ankle:
This one's easy. That big bump on the outside of our ankle? It's called the lateral maleolus -- place a piece of tape there. This is a good estimate of the center of the ankle joint.
Important Technical Note:
Any time we're trying to measure off video there is chance for error because of how the camera's eye sees the subject. When the camera is oriented perpendicular to the subject we will get the best results. Let's take the picture of the lateral view that I used previously:The camera is nearly on level and perpendicular to the hip, but it could be better placed if it were moved lightly to the right so that it was more in the middle of the rider rather than being slightly biased to the left or back of the rider. This would provide better measurements for the knee and ankle. We want as clear and straight a line of sight from the the camera to the joints we're going to be measuring and any "oblique" views should be kept to a minimum to avoid distortion to the greatest degree possible.So for our purposes, keeping the camera oriented vertically and about the level of the knee or slightly higher is best.Place the bike on a stationary trainer since this will give us the most control of the recording process. Record the cyclist for anywhere from 15-60 seconds. You want enough video so that you have the best chance of getting a few frames showing the knee at its straightest at the bottom of the pedal stroke. Ideally you'd like to have a couple of these "dead bottom center" positions to measure.Now you'll use your analysis app of choice and in this position we want to measure the knee angle and the ankle angle. There are many of these in botht he Apple and Android app stores. I have used and had good luck with Coach's Eye and the free Dartfish app.Measuring the knee angle doesn't have to be any more complex than running the angle tool on your app from the center of the knee, and roughly bisecting the thigh and the lower leg to run through the center of the hip and ankle joints. Depending on the frame rate you're able to film at, the joints may be blurry so there will have to be some "guesstimating" done at the exact center of the joint position. The tape markers you placed earlier are likely to not be perfectly clear. Will this be 100% accurate? No, of course not because we're still using a relatively coarse form of measuring, but with a bit of repetition we should be able to get some useful numbers all the same. Measure all the frames you have at the point of maximum knee extension (or at least 2-3 of them) and average those numbers together.Now take this number and subtract it from 180.For the ankle, run your angle tool from the center of the ankle joint to through the lower leg to the knee and through the center of the foot. Same as for the knee -- measure the angle a few times just to be sure.Now take this number and subtract 90 from it.Again if you have multiple frames that visualize the bottom end of the pedal stroke -- with the knee at its straightest -- go ahead and repeat this for those frames as well. Each of these is only one instance of the leg at the bottom of the stroke and there could be (or likely will be) small variations so we'll get the best results if we can assess as many as possible. If there are small variations, average these numbers out. For instance if you measure three different frames and your final knee extension numbers for these are 41°, 42°, and 40°; then your resultant average would be 41°.
Analyzing the Numbers
There is no one set of numbers that everyone should be. In fact that's what makes bike fit so difficult -- there many individual variations that are still considered "normal". We can apply some basic ranges, or what are sometimes called "normal limits", to these knee and ankle numbers as a guide to work off.
- Ankle 10-20° ; The larger the number, the more "toe down" the ankle position; smaller = "toe up"
- Knee 35-45° ; The smaller the number, the straighter the knee, larger= the more bent the knee.
At one extreme, if you have a larger ankle number -- say 25° -- and a smaller knee number (35°) then you're reaching for your pedals too much and you need to lower your saddle height.On the other extreme, if you have a small ankle number (0°) and large knee number (45°) then you're "squatting" on your bike and you need to raise your seat up.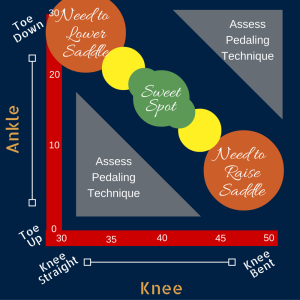 Not everyone will fall neatly into one of the colored areas on this graph -- notice especially the areas of navy blue just outside the green, red and yellow sections. This graph isn't meant to be a rigid tool, but rather it's a rough guideline, so that if you fall close to one of these areas they might point you in the direction of the correct fix.It should also be noted that the ankle measurement can have even more variation than what is shown on the graph. In my years bike fitting, I've seen many people who naturally "toe-down" more than average and no amount of cleat adjustments or other bike fit changes makes a difference. Perhaps with a lot of skills training exercises this habit could be trained out of them, but in the absence of negative effects I don't think this is a particularly useful use of time. Likewise, some riders will excessively drop their heel (into a "toe-up" position at the ankle) naturally. A bike fitter needs to know their place and be able to discern when to intervene in instances like this and when it'll potentially create more problems than it'll solve.Some clarifications: The yellow areas each follow the same instructions as the orange sections next to them. For instance the top-left yellow section means that the rider will still have to likely lower their saddle - just not as much as the orange section. Likewise, the bottom-right yellow still needs to raise the saddle, but less than it's corresponding orange section.
Ch-ch-changes
If you do have to raise or lower your saddle then how much should you do it? In general it's best to err on the side of caution and start small. If you fall in one of the orange sections, you might only move about 1 cm at a time and then go ahead and re-test with your video assessment skills. If you're still way off, go another centimeter and test again. If you fall in or near the yellow sections then you might change by 0.5 cm at a time.The next question is, should you continue to change until you're "perfect" or fall exactly into the green "Sweet Spot" on the above graph? And the answer to this is a resounding "No!". Especially the further you fall from the "Sweet Spot" to begin with -- the further away from this "ideal" you start, the sooner you'll probably stop the changes - at least on the first day -- short of this green area. This is for a couple reasons:
- During even a professional bike fit, not all the changes to the rider's mechanics will happen on the first day. This is because soft tissues need to adapt to their new lengths, and new motor plans (in the neurological system) need to be created around these new postures and ranges.
- In relation to this, some people are slow adapters and some are quick -- not everyone will easily absorb changes and in fact even a moderate bike fit change can create problems for some individuals so moving slowly rarely has a penalty associated with it.
Make small changes, retest, and let your body adapt.In the next installment - the 300-level course - we're going to dive even deeper. We'll explore some basic off the bike tests that apply most to saddle height, and learn a bit about how to apply this information in our decision-making for the actual bike fit. We're going to run through some more complex scenarios; like when it might be necessary to leave someone outside of our range of normal measurements. And finally, there'll be more in depth instruction into how to accurately locate and set the landmarks for the joints of the lower extremity. Much of this information will meet or exceed what you're likely to experience at a paid bike fitting school or seminar (to the tune of $500-$1000 a day) and it will all be free for anyone to learn from.Please let me know if this was helpful or if you have any questions or comments about the process. You can reach out to me on social media, in the comment section below, or shoot me an email about this topic.