
Perform a (not so) basic bike fit | Pt 1: Hardware, Software and Setup
This is going to be a series of articles aimed at teaching anyone who wants to know how to do a basic bike fit. In truth, this will be more than just a basic bike fit. In fact, in some respects it may contain more detail than you can get in a bike fit in your area.
In addition, it will include information that you don't get at the popular bike fitting schools.
Why would you want to go through this education series? After all, it will take some time and require some effort on your part. But the upside, even if you never plan to do a bike fit, is significant.
If you're an athlete, you will undoubtedly learn a few things about your own mechanics and help you mesh to your bike better even if you don't follow every step to the letter. But I guarantee, if you do, you will come away with multiple ways you can improve your bike fit. You will simply learn more truth about what it takes to have an optimal bike fit....I'll be dispelling myths along the way.
Perhaps you're a bike fitter already doing some bike fitting in a bike shop setting. If that's the case this course will cover some ground that you only get exposure to on the expensive multi-day courses through the available fit schools. I can attest from first hand experience that some of the information here is not covered in these courses.
Finally, maybe you're a PT or other health care professional looking to get into performing more bike fittings as a source of cash business for your clinic. This course will kick-start that process, by short-cutting you to the basic pearls you need to understand to bring together your PT practice and your interest in serving cyclists.
No matter what your background or goal, my aim is to provide a basic framework on how to begin a bike fit and how to start to approach the decision making process.
What makes a great bike fit?
Exceptional bike fitting is made up of a few parts, and we will address all three of these in these courses but it's unrealistic to think that we will max them out. These three parts to a bike fit are:
Accurate measurement technology, BUT
Getting everyone access to the best (and most expensive) bike fitting technology isn't possible.
What I will give you though is the knowledge on how to leverage the technology that most of us have at our disposal to assemble an excellent system of measuring.
Knowledge of the human body, biomechanics and how it responds to changes, BUT
I can't teach everyone to have the knowledge of the human body and biomechanics that a PT that's been practicing 20 years will have.
If you're background isn't in biomechanics, we'll cover a lot of ground to get you started on how to read the data and movement of a cyclist in an easy to digest manner.
Understanding of the basics of the bike, how to adjust it, and what effects those adjustments might have on the bike+rider unit, BUT
While we can address many of the basics of bike fundamentals and adjustments, we won't be able to instill the full knowledge that doing thousands of bike fits over many years.
This one will come with time and practicing your skills over and over. If you can start with the first two fundamentals, you have a great foundation to move forward here.
So without further ado, let's get into it. I'm going to first fill you in on the basics of :
Bike Fit Technology
The days of dropping plumb lines and measuring with goniometers (analog angle finder for joints) are over in bike fitting. I know there are still bike fitters and PTs out there using these tools to perform their bike fits, and while they may still have their place somewhere in this industry for a quick, cheap check of someone on their bike, they don't have relevance in the type of bike fitting that can solve real problems (big and small) and wring out the last bits of power, efficiency and comfort for all cyclists, from the pros all the way down to the recreational weekend warrior.
Before higher level technology was available, this is how I had to perform bike fittings, and I thought I did a pretty good job. Being a PT gave me a particular insight into how people moved more than most bike fitters since there weren't many PTs fitting bikes back then. When I first began using these accurate and more expensive technologies in my practice fifteen years ago, I quickly saw how much I was missing and how much more there was to learn. To say that these technologies are a game changer is an understatement.
So how are we going to solve this technology problem for a DIY bike fit without spending $30,000+?
We're going to leverage the enormous advancements in digital video technology that have taken place in the last 25 years (but especially in the last 10 years). Couple that with some truly excellent free software available to measure the specific motions and joint angles we need to. While this may not be as accurate or as time-efficient as an infrared motion capture system, it will serve our purposes perfectly in that it can provide vastly more usable data than "eye-balling" or using plumb lines/goniometers can.
The Hardware
The hardware is the camera you have at your disposal that shoots with the highest frames per second (fps). This won't be as big a hurdle as you might think. A high frame-rate camera you could have around might be a 'point and shoot' or a DSLR, but it's very likely that your best option might be a GoPro or even your phone. Ideally we'd like 60 fps but if 30 fps is the best you have access to, this can work as long as you're willing to be patient with some blurry segments (more on this in a minute). The new iPhones can shoot at 120 fps and my GoPro will record at 120 fps at 1080p and 240 fps in WVGA. (These higher frame rates create video files that are MUCH larger, so if you plan to upload or try to send the video to someone — like me — these can get quite cumbersome. In those cases, 60 fps is plenty)
Maybe you don't own any of these tools, but do you know anyone that has one you can borrow? Like I said, these are pretty common these days so you can probably make it happen. Even being able to borrow someone's iPhone, GoPro, DSLR, etc for a few hours to do the recordings can make a big difference.
If you shoot with a lower frame capture rate (fewer frames per second), you'll end up with a blurrier picture so it's a little more difficult to locate your landmarks on the faster moving joints, like the foot and knee. Also when you pause or freeze the video it may not stop at exactly the spot you want to measure. For instance you may want to measure the knee when it's at its straightest, but it won't pause at the bottom of the pedal stroke -- it stops just before that and if you advance one frame it stops just after. This happens with lower frame rates videos because there are fewer frames taken per pedal stroke. So each frame might consist of 15°-50° of the pedal stroke -- one frame stops with the crank at 3 o'clock and the next frame might not stop until 7 o'clock. This is also what causes the frame to be blurry. If you're in this scenario and you really need to look at a particular point in the pedal stroke, take extra video to give yourself more chances to capture that point. Often if you keep advancing through the video one frame at a time though you'll find a point when it stops at the point in the stroke you need so you can get your measurements.
Bike Fit Video Analysis Software

basic bike fit
Just about everyone has access to some reasonably high speed video capture technology (even if you don't already know it - we'll get to that in a minute) and the software to analyze it. The software can come in the form of phone and tablet apps like "Coach's Eye" and "Hudl Technique" or "myDartfish Express". These free tablet and phone apps are great and I use them in my PT practice, but cycling has some specific characteristics, namely the speed of the pedal stroke, that can make using mobile device cameras and apps less effective.
A newer piece of software for this video analysis is the website Motionysis. It’s web-based, very easy to use and has great features for quick and accurate looks at your mechanics. I can’t recommend it enough.
Another good option is Kinovea. It is pretty much fully featured movement analysis software, similar in a lot of ways to Dartfish and it’s free (although you should donate a few bucks to their cause which is good form for freeware like this). I know that while Dartfish has more capabilities that are necessary to the power-user, it also costs more than a few bucks. For the purposes of how we're going to use it, Kinovea provides more features than we'll need, it's easy to use, and the price is right.
I'm not going to go into the details of learning these programs since the apps themselves have instructions.
If you're using your phone or tablet for this entire process, you'll be able to record and immediately begin analyzing your shots. With Kinovea (or Dartfish for that matter) you will either have to record your videos directly into the software using a webcam with as high a frame rate as you can find.-or-You can record the videos with a camera that has better capabilities (higher frame rate) and import them after the fact. Recording directly into the software can be difficult just because the camera that can produce a clear image of the knee, foot and ankle even as they are speeding through the pedal cycle at 90+ rpms, isn't very common. As I write this, the highest frame rate I can find in a webcam is 30p. At this frame rate, the foot and ankle will be quite blurry at most of the points in the pedal stroke. "Ip cameras" can produce higher resolution but they can present problems with installation and they can easily run from $500-$3000 a piece. Basler is a company that makes scientific-level cameras that can do amazing things but they require a very high end laptop or computer just to keep up with the video stream and also cost about $1000-$3000 each.If the absolute best camera you can get your hands on (think phones, tablets, GoPros, etc) still only shoots around 30 fps, then you could certainly use a webcam that does the same and import it directly into the software so you can begin analyzing quickly. Unless you're planning on doing this for a living as a professional bike fitter and you want to keep the bike fitting process moving quickly, there's very little penalty to recording and then uploading each video file into the software. This opens up your options to better cameras and therefore better resolution and frame rates. See below as I go more into the hardware.
**A quick note to aspiring bike fitters: If you're trying to become known as a bike fitter it will pay to begin investing as you can in more advanced equipment. You'll be taken more seriously by your clients if you show you're serious by investing in your craft. Certainly, equipment and technology doesn't trump the knowledge of fitter, but having a cobbled together or half-assed setup will only work against you in the long run.**
Above is a picture of me using Hudl Technique. The video was shot on my phone, which I then transferred to the tablet in order to use the larger screen.A couple important things to notice about this:First look at how blurry the foot and ankle area is -- this is because the video was under 60 fps so that when I paused the video, an individual frame of the video represents a few inches of movement at the foot. The ankle is the most problematic joint as far as getting blurry images, although the knee will also be a problem with the lower frame rate cameras.The next thing to notice is how small the actual image of the rider is. I'm zoomed in some here and still the rider's leg is perhaps six or seven inches tall. This will be discussed later in this article as we get into setting landmarks for measuring joint angles because trying to discern a joint landmark on a screen is really difficult compared to if you pre-mark your landmarks in the actual rider ahead of time.
Setting up the Shot
So let's say you have some sort of camera that shoots 60 fps. In order to get the best and most accurate readings from the video you'll shoot there's a few things you'll want to do to prepare.As I mentioned in the 200-level module for saddle height, if the camera positioning isn't tightly controlled then the "view" of the joints we're measuring will be skewed and our measurements compromised. If possible, mount the camera on some sort of tripod, either real or fashioned. Borrow a tripod, or duct tape it to a stack of books....whatever you can do to make the camera position stable and repeatable (just don't use duct tape if you're borrowing a camera!).
What the heck's a parallax?
basic bike fit

basic bike fit
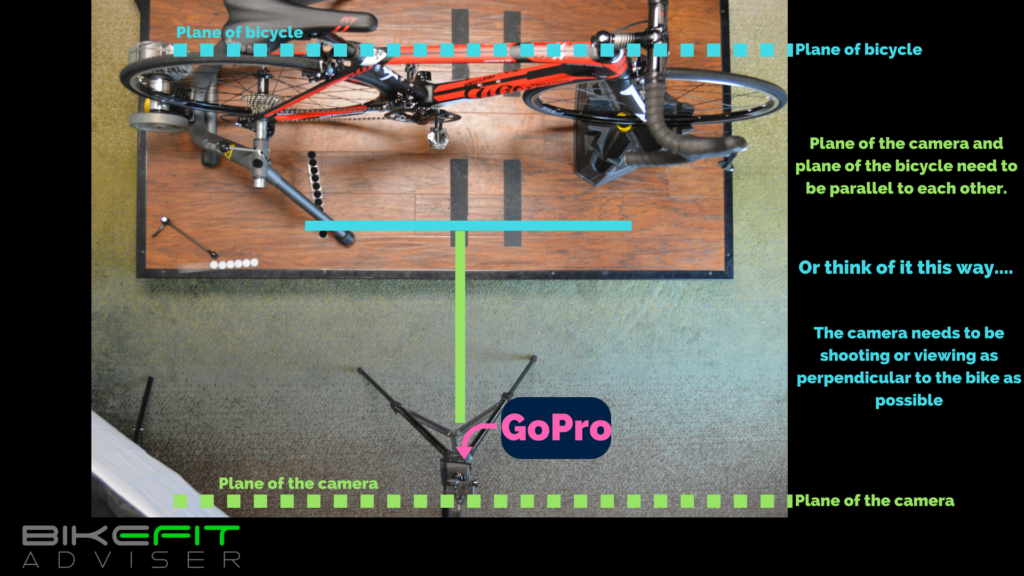
A critical factor in setting up your camera is to get it as perpendicular to the body/bike as possible -- not pointed up toward the ceiling or down toward the ground, not angled toward the back or front of the bike.
Get it as square as you can.
This is really important. In a near-perfect setup we'd use self-level lasers (like this Leica laser) that are run in-line with the camera to make sure we're at 90º angles. This is no small task (and also not cheap) so in the interest of cost and time we'll just do the best we can with what we have.
Why are we so concerned with camera orientation? Simply, if we're not viewing things square this will introduce error into our measurements because it introduces a parallax into our view.
What's that? Here's the explanation I remember from 5th grade: Imagine you're in the back seat of the car when you were a kid sitting behind the front passenger seat...if you looked at the speedometer, the needle would read a different speed to you than it would the driver because the face of the speedometer is not angled directly toward you. It's also why reading an analog clock from the side is challenging and usually we'll walk around to face it to get a better, more direct view.
The basic position for the camera is the most important aspect of the setup. You can go about this a couple ways.
The one-shot camera positioning
If you want to take one shot of the whole body for all the measurements then the camera should be just below hip high, centered left to right (on the rider). This will give you a good view of all joints and minimize the distortion over the whole body -- being at hip height and mostly equidistant from the feet and shoulders should yield reasonably good measurements here. This is likely sufficient for most people.
The two-shot method
For better accuracy, you could break the recording into two sections -- from the feet to just above the hips (lower body) and from just below the hips to the top of the head (upper). This is a bit more cumbersome, but it has the potential for making the measurements more accurate since you will be able to have the camera closer to the rider and the camera won't have as much distance vertically from the structures it's measuring (i.e. a camera placed vertically at the level of the knee only has to "look down" a short distance to "see" the ankle). Likely overkill for most reading this, but having the camera closer might help neutralize some of the inaccuracies you might experience from camera limitations or your skill with setting landmarks and angles in the software and it just might improve the repeatability of your measurements as there are potential benefits to intra- and inter-rater reliability. Again this may be more than is necessary for you to do a basic bike fit, but this second camera shot could improve accuracy a fair bit.
If you decide to go this route, I would suggest setting up the camera mid-way between the hip and foot (at the bottom of the pedal stroke) to shoot the lower body, and again, mid-way between the hip and shoulder when shooting the upper. This will provide the best balance in camera view accuracy.
What would I use?
I don't use video as a primary means of measurement in my bike fit practice, but if I wanted to get the best video and measurements I could I would use my GoPro Hero4 -- it's a couple years old but will serve these purposes well. I would set it up on an old tripod I have laying around, that I think I got for free with a camcorder about 20 years ago. I'd record either in 1080 mode at 120 fps or in WVGA at 240 fps. In most cases I opt for the higher frame rate of WVGA because each frame is very clear and when I advance forward one frame at a time the pedal only moves a few degrees so I can generally measure any point in the pedal stroke I want.
LIGHT!
In order to get the clearest picture possible at such a high frame rate we absolutely need to get a lot of light on the rider so I use two high wattage studio lights.
This is a critical point: The higher the frame rate you're shooting at the more light you'll need. Since the shutter is opening and closing faster (to get the faster frame rate) it can only let in a certain amount of light in that short period. In fact, many cameras, including the GoPro, will slow down the frame rate it's capturing at if it doesn't have enough light, so without the light you might not get the 240 or even 120 fps you thought you would.
As I mentioned, I use two large studio lights -- like the ones photographers use on photo shoots except cheaper. I got two complete lights with diffusers and high powered bulbs for about $70 on Amazon. You don't have to go to these lengths because often just shooting in a bright room with big windows at the right time during the day can provide enough light. Even using extra lamps (you might need a couple of them and with strong bulbs) can help with this as well.
Just make sure there isn’t light behind you! Don’t have a window or any wall or ceiling lights in your background since they will then make the foreground seem darker. Keep as many lights as you can behind the camera and pointed at the bike on the trainer.
Another reason I like to use the GoPro is because of the app that allows to you to see the field of view of the camera (making setup easy) and allows you to change recording settings as well.
Here's a brief video showing the setup I use, including the step by step process of using my phone and the GoPro app to make sure I get the right show.
Password : video fit
Now that we've gone over the basics of the hardware and software, let me give you an idea of where we're headed.
The next module we'll cover the basics of anatomy. Especially when using video as a measurement technology we need to take steps to maximize our accuracy since it can suffer in this area when variables aren't tightly controlled.
Remember we're using it not because it's the best option for measuring but it's the best cheap option available to a wide scope of people. In order to get the most out of the data, we'll want to pre-mark our joint landmarks that we'll use to analyze the joint angles. I'll show you how to palpate and find these joint landmarks in detail.
The third module we'll be learning about the angles, motions, and ranges we expect to see at the joints of the leg during the pedal stroke. We'll go into some detail about how these numbers can relate to pain, injury, and the efficiency of the rider. After some practice with this we'll be able to draw conclusions on what changes we might make to the bike as part of this (not so) basic bike fit.
Finally in the fourth installment we'll go through a number of actual video bike fit sessions. I'll include context into their complaints, injuries and movement restrictions so that you can see the entire process and gain a deeper understanding of the process and the associations and complex decision-making we need to undertake in a professional bike fit.If you know of anyone who you think would enjoy this free education program, please feel free to send them to our sign up page. Registering as a member is always free.