
How To: Use a road bike for triathlon
Can I use a road bike for triathlon? There are many reasons that someone may not take the plunge on a dedicated triathlon bike. Perhaps a second bike isn't in the budget, or there's not enough room to store it, or simply the athlete isn't sure they'll do that many triathlons. I can appreciate the logic behind trying the sport first through a couple distances before dropping the money.**It should be noted that I make a distinction between riding a bike in the aero position and "just riding". I believe there is benefit to most triathletes to maintaining the ability to ride a bike in the standard road position especially when tackling long training days far removed from race day as well as rides containing even moderate amounts of climbing and descending. Triathlon-specific bikes just don't excel going up and down.**So if you plan to use a road bike for triathlon, what options do you have?I like to break them down into three distinct choices from cheapest to most expensive. But even the most expensive option is still significantly cheaper than buying a complete triathlon bike, and I would argue that it could be pretty darn near as efficient.
1. Just ride your road bike as-is
Yep, you can do it completely old school and ride your ride bike with no modifications. Use the drops, if you're able, to get more aero and go to work. This has the benefit of being the most cost effective way forward, and you're in no way changing the road bike, so the bike will climb and descend and perform when "just riding" as normal.The downside is that the aero benefit (relative to a traditional triathlon position) would be just about zero. Since our body is the cause of more than three-quarters of the aerodynamic drag we experience, there are significant gains to be made by adopting a more tri-like posture.If you planned to race in a very hilly or mountainous race, then you might not fair too badly, but long stretches of flat would be likely to add a good chunk to your bike time.
2. Use shorty clip-on aerobars
The next simplest fix would be to use short clip-on aero bars. This can be done very easily in just a few minutes and the cost is minimal -- around $75-$150 depending on the bars you choose.Why did I make the distinction of using short clip-ons? Because traditional aerobars, clip-on or otherwise, are designed around having your arm rest on the pads at, or nearly at, the elbow. If you do this on an otherwise unaltered road bike, your aero position will be much too stretched out and not only are you very likely to experience saddle discomfort, but your low back and shoulders will probably be none too happy as well.Let me explain further...Road bike position is traditionally built around a seat tube angle of 72-75 degrees while triathlon bikes run from 77-82. The triathlon bike is going to have a much shorter reach from the saddle to the bars the road bike. The Effective Top Tube (ETT) measurement is likely to be around 2-3 cm shorter on a triathlon bike (depending on a few factors it could be a few millimeters more of less than that).As an example, I ride a road bike with a 54.5 cm effective top tube and I'm most comfortable with a triathlon bike with a 52.0-53.0 cm ETT.Aerobar pads hover somewhere in the vicinity of the handlebar, but in a standard road bike position our elbows are positioned much further back than this.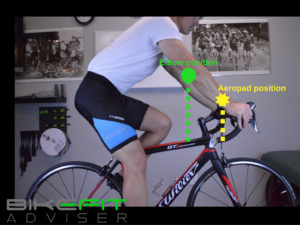 With standard length aerobars our elbows will be forced much further forward, increasing the reach of the bike considerably, stretching us out significantly. This has the effect of requiring a lot of stabilization through the lats, the chest, not to mention the strain that the over-reached position places on the shoulders and neck.This often leads to a very uncomfortable saddle because instead of remaining on the back half of the saddle as we do when in the road position the rider is drawn forward on the seat, in an effort to shorten the reach to the aerobars, and we eventually end up sitting on the narrower, middle portion of the seat.
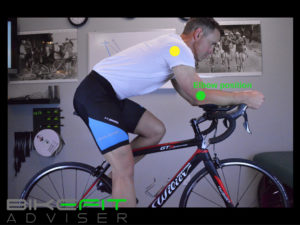 Having the shorter clip-ons allows us to rest on the aeropads in the middle of our forearms, rather than near the elbows which shortens up the required reach, allowing us to support the upper body more reliably by having the elbows underneath the shoulders.
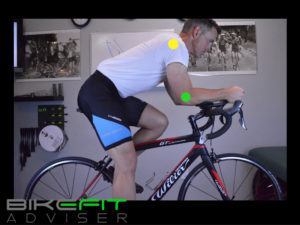 This allows you to not compromise your road position and then easily fall into an abbreviated aero position as needed.If you're going to do a couple sprint or Olympic distance races, this might be a good option. I've done a 70.3 triathlon with this setup, and while it wasn't my fastest time, it also wasn't my slowest and was able to pass quite a few people on dedicated tri rigs.
3. Seatpost, saddle, aerobar change
The final way to use a road bike for triathlon involves a few more equipment changes, but it also produces the best result. Using this method we can achieve an aero position that is very nearly on par with a triathlon specific bike.We're going to place standard length clip-on aerobars on the bike this time but we're also going to use a whole new seatpost -- one that moves the saddle forward a couple centimeters to shorten up the reach of the bike. These are called "forward seatposts" and they've been around for a long time. I did a number of 70.3 races as well as my first 140.6 triathlon (nearly 20 years ago...yikes!) on a setup like this.Here's a standard seatpost next to a forward seatpost: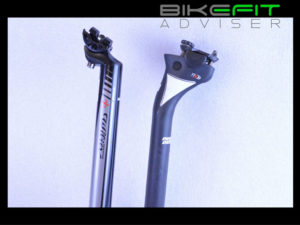 It's easy to see how the forward post will shorten the reach of the bike considerably by moving the saddle towards the bars.Note: When we implement a forward seatpost, all things being equal, it may be necessary to raise the saddle slightly (a couple millimeters) and there's a reasonable chance that we'll actually be able to lower the aerobar pad height slightly as well.After the clip-on aerobars and the forward seatpost, I usually recommend to my clients that we just invest in a new saddle to live on the forward seatpost. This way we can get the benefit from a triathlon-specific saddle design and it also allows us to quickly get the bike ready for a tri ride or switch back quickly for a road ride.How does this work? We'll make things easier on ourselves by having the correct saddle height marked on each with some electrical tape. The we can just quickly swap in the forward seatpost (with the tri saddle on it) when we have a race or want to spend some time in the aero position during a training ride or back to the road seatpost and saddle when we're going to do more of a road ride perhaps one with a lot of climbing (you'll see in a second why we might want to do this -- see the next paragraph). The aero bars remain in place. With this method our road position remains unaffected which can be a benefit to those of us that like to do some longer rides with our standard road setup.Where this method falls short is in the handling department. Because the wheel axles are positioned with a road bike in mind (and of course we can't change this) the bike won't be balanced as well when you are in the aero position and so high speed maneuvering and descending will not be as predictable. Now triathlon bikes aren't exactly known for their stellar handling characteristics on downhills anyway, but it's important to realize that there will be an even greater difference on a road bike that's converted to the aero setup.What about aero-shifters? you ask... Well, they certainly can make the aero position more seamless since there's no need to break the position to shift the bike, but it also is much more complicated to switch over the drivetrain and braking systems. further, it eliminates our road position since bullhorns bars and reverse brake levers will almost always have a different reach than a road bar and shifters. I generally only recommend this position for athletes attempting the 140.6 distance races. In my opinioin, any of the distances below that, it's just too much of a hassle at the expense of your road position.If you get to the point where you're ready to pull the trigger on a dedicated triathlon bike that's great, but in the meantime use these tips to get the setup that suits your needs.